Classroom Audio Visual System
 Basic Classroom Audio Visual Equipment
All classrooms have a standard audiovisual setup that includes the following:
- Dropdown screen and/or flat panel displays
- Ceiling mounted projector
- Document camera
- Desktop computer connected to the network and internet
- Wireless network access
- A connection (VGA and/or HDMI) to accommodate connecting laptops to the projection system.
Self-Service Approach
The setup is designed as a self-service system. That is to say, it can be operated by the end-user community without intervention by IT professional resources.
Making AV Work
Controlling many of the classroom audio visual components is a matter of pressing the correct button.
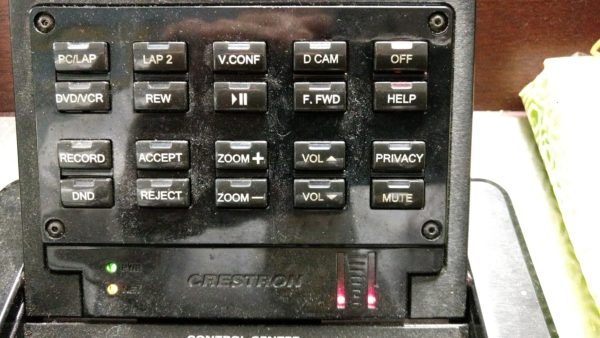
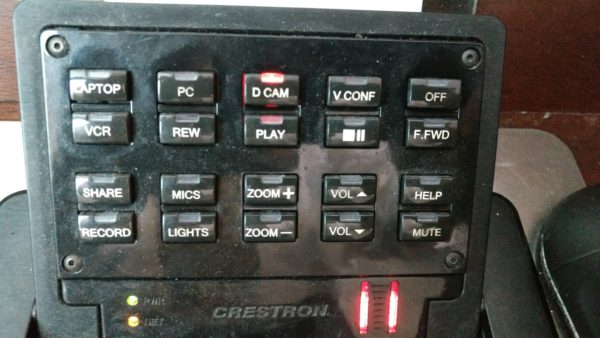
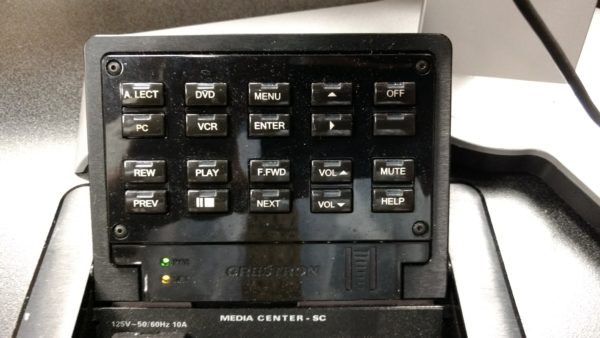
In each classroom, AV components are controlled by a panel located atop each lectern called a cubby.
Please note the following images
Scroll down and find the cubby image that matches your classroom

PC/LAP – Will cause the projection screen to drop, projector to turn on, and then will display whatever is on the desktop computer screen onto the projection screen.
Laptop option: If you plan to use a laptop instead of the classroom desktop, simply plug the laptop into the VGA or HDMI connection found on the lectern. Once plugged in, the AV system will automatically display the laptop screen onto the projection screen.
Does the term ‘VGA’ or ‘HDMI’ sound unfamiliar? If so, please contact the Information Technology Department for consultation.
D.CAM – Will display the contents under the document camera onto the projection screen.
VOL buttons – Will adjust the volume of the speakers in the classroom.
Notes:
If you intent to show a video, you must also ensure that the volume on the media player or streaming service (e.g. YouTube) is properly adjusted. Otherwise, you may not hear anything or the volume will be unusually low.
If you’re not sure what the above paragraph means, contact the Information Technology Department for consultation.
Sound level is also controlled by the quality of the recording.
OFF – Turns off the AV system

PC/LAP D.CAM – Will cause the projection screen to drop, projector to turn on and then will display whatever is on the desktop computer screen onto the projection screen.
Laptop option If you plan to use a laptop instead of the classroom desktop, simply plug the laptop into the VGA or HDMI connection found on the lectern. Once plugged in, the AV system will automatically display the laptop screen onto the projection screen. To utilize the desktop, simply, unplug the laptop from the VGA or HDMI connection.
Does the term ‘VGA’ or ‘HDMI’ sound unfamiliar? If so, please contact the Information Technology Department for consultation.
D.CAM option: If you plan to use the classroom document camera, simply turn on the camera. The AV system will automatically display the document camera image onto the projection screen. To return to the laptop or PC image, simply turn off the document camera.
VOL buttons – Will adjust the volume of the speakers in the classroom.
Notes:
If you intent to show a video, you must also ensure that the volume on the media player or streaming service (e.g. YouTube) is properly adjusted. Otherwise, you may not hear anything or the volume will be unusually low.
If you’re not sure what the above paragraph means, contact the Information Technology Department for consultation.
Sound level is also controlled by the quality of the recording.
SYSTEM OFF – Turns off the AV system

PC – Will cause the projection screen to drop, projector to turn on and then will display whatever is on the desktop computer screen onto the projection screen.
LAPTOP – If you plan to use a laptop instead of the classroom desktop, simply plug the laptop into the VGA or HDMI connection found on the lectern. Then, press the LAPTOP button to display the laptop screen image onto the projection screen.
Does the term ‘VGA’ or ‘HDMI’ sound unfamiliar? If so, please contact the Information Technology Department for consultation.
D.CAM – Pressing the document camera button turns on the document camera and projects whatever is under the camera onto the projection screen.
VOL buttons – Will adjust the volume of the speakers in the classroom.
Notes:
If you intent to show a video, you must also ensure that the volume on the media player or streaming service (e.g. YouTube) is properly adjusted. Otherwise, you may not hear anything or the volume will be unusually low.
If you’re not sure what the above paragraph means, contact the Information Technology Department for consultation.
Sound level is also controlled by the quality of the recording.
OFF – Turns off the AV system

PC – Will cause the projection screen to drop, projector to turn on and then will display whatever is on the desktop computer screen onto the projection screen.
A. LECT – If you plan to use a laptop instead of the classroom desktop, simply plug the laptop into the VGA or HDMI connection found on the lectern. Then, press the LAPTOP button to display the laptop screen image onto the projection screen.
Does the term ‘VGA’ or ‘HDMI’ sound unfamiliar? If so, please contact the Information Technology Department for consultation.
VOL buttons – Will adjust the volume of the speakers in the classroom.
Notes:
If you intent to show a video, you must also ensure that the volume on the media player or streaming service (e.g. YouTube) is properly adjusted. Otherwise, you may not hear anything or the volume will be unusually low.
If you’re not sure what the above paragraph means, contact the Information Technology Department for consultation.
Sound level is also controlled by the quality of the recording.
OFF – Turns off the AV system

